showcase-scrivener_header.png

Scrivener: The Ultimate Guide to Exporting Ebooks (Kindle, ePub, etc.)

Share this post:

Since I began publishing my books, I’ve been using Scrivener for the writing and editing process. If you weren’t aware, I’m a ridiculously-huge fan of Scrivener, and you can read about it more here (by the way, it’s available for Mac and Windows, and through the Mac App store and they offer a free trial as well).

The problem I’ve faced with Scrivener is that it gets a little complicated to export for the certain formats I need, like print and e-book. It works exceptionally well, but getting things to look good and also work well with the different formats out there became somewhat of a drawn-out process for me.

While the print side of things is going to differ from one author to another, as you know the Kindle is pretty much standardized throughout their line of products. Essentially, you’re looking at a barebones HTML file, sans things like ordered and unordered lists, fancy CSS styling, and such.

What I hope to do in this post is provide you with a super-simple method of going from what you’ve written and edited to a format that works on every format, for every device. A tall order, to be sure, but it can be done: the key is simplicity. We’ll basically “strip down” your Scrivener file to its bare essentials and then format to ePub. From there, we’ll use a free program called Calibre to bounce it out to Kindle’s proprietary format, .mobi.

First things first: make sure you install Calibre. It’s a wonderful program, and I use it for eBook management and organization, but also for cross-format conversions. 

Ready? Here we go!

1. Format your document. 

The key to formatting for eBook is to keep it simple — readers and devices don’t usually do so well with lists, fancy formatting, CSS-styled chapter headings, and the like, so make sure you’ve taken this stuff out. I usually don’t change anything Scrivener when I start a new document, and I use a simple bolded heading for subchapter headings.

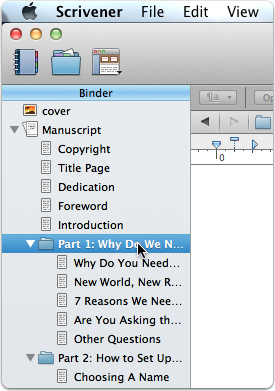
As for the actual chapter headings (parts, acts, scenes, chapters, etc.) I try to keep everything in a folder/document hierarchy. This means that I have a simple “folder” (Scrivener lets you set up folders and text documents however you want, so the word “folder” here is subjective) for each larger part, and then individual text files for each underlying chapter. Here’s what it looks like in my Scrivener file:

As you can see, I have three basic hierarchical structures:

  1. Anything outside of the main “book:” The “front matter,” like the Copyright page, Title Page, etc., and the stuff after the main book, like the “About the Author” page, excerpts from other books, etc.
  2. Main “Parts:” If you split your book up into parts, acts, or structures larger than chapters, you can use the folder icon to organize them. I place individual chapters inside of these “folders.”
  3. Chapters, or smaller sections: Individual chapters, segments, or however else you break up your manuscript. These are the lowest sections (hierarchically speaking) of the book pictured above (Welcome Home: The Author’s Guide to Building A Marketing Home Base).

You can copy this format, or tweak it accordingly. Understand that the rest of this tutorial is going to be based upon my formatting you see above; that is, a three-part hierarchy (again, I like to keep things simple).

2. Time to Compile!

Once you’re happy with the hierarchy you’ve chosen, it’s time to compile. Scrivener has an amazing built-in compiling feature, but we’ll still need to tweak a few things to get an ebook format that works across the board.

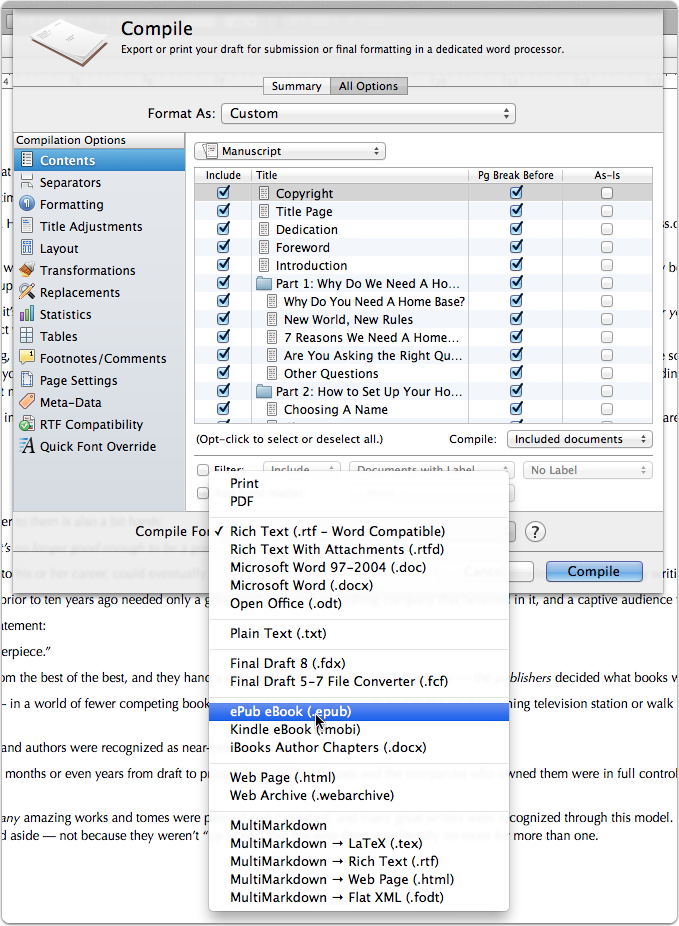
To compile, go to File > Compile, and you’ll see this dialog box come up:

Next, select “ePub eBook” from the “Compile For” dropdown menu. ePub is a format included by Scrivener, and it’s what we’ll use for the universal export format.

Note: Yes, there is a “Kindle eBook (.mobi)” format, but in my experience with it, it’s still a little quirky and doesn’t handle the special Table of Contents and “location” stuff the Kindle needs to display a document correctly. Because of this, we’ll use the “ePub eBook” format, and then finish the conversion job in Calibre. 

3. Mess with the Level formatting – Standardize your font choices.

Scrivener does a great job with most of the settings, so you won’t need to change most of them unless you really want to.

That said, we do need to mess around with the settings under the “Formatting” pane. These options let us set up the titles, general styling, and font specifications of the finished document.

Remember, there’s not a whole lot of formatting that will “carry” throughout the different formats, so we’ll opt for simple things like bold, italicize, font sizes, and capitalization.

If you’ve used the formatting hierarchy that I chose, you’ll see these four “Levels” when you click on the “Formatting” pane:

  1. “Level 1+” (with the folder icon) is the first option, and that corresponds to the folders in my document, which I use for the different Parts of my book.
  2. “Level 1+” (with the two pages icon) is the second option, and it’s one of the included Scrivener options. That means I can’t delete it (using the little “-” minus sign in the top right), but I’m not using this level anyway, so it doesn’t really matter.
  3. “Level 1” is the same level as the “Level 1+” folder icon, which means it’s going to be the level I use to format the front matter and back matter of the book.
  4. “Level 2+” is the individual chapter hierarchy I’ve chosen, and so it will need to be formatted as well.

The first thing you’ll want to do is standardize the fonts used in your document. I’m not sure if the Kindle does any font size standardization, but it’s just good practice to use consistent fonts and sizes throughout your document anyway.

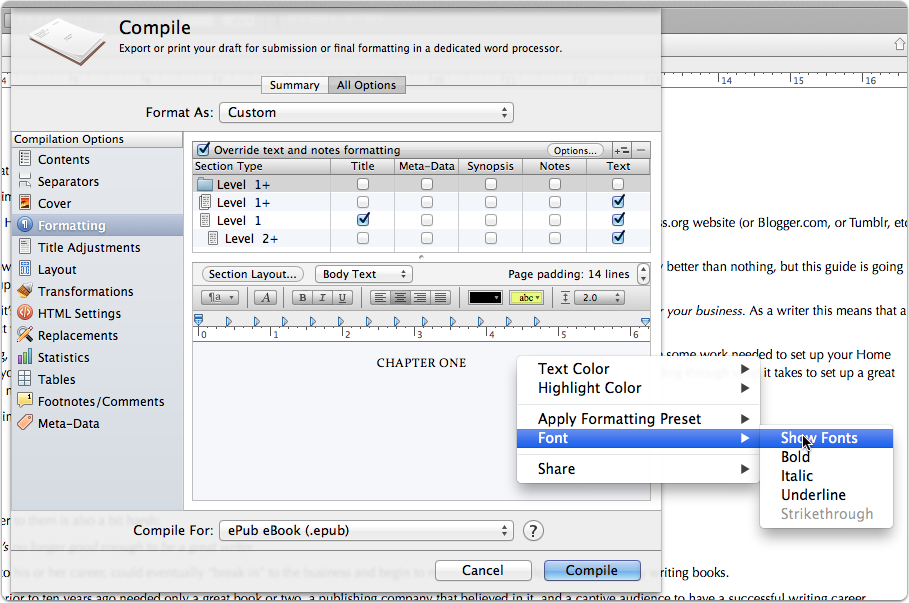
Start by clicking through each Level and use the Fonts dialog popup (right-click in the Level preview viewer, go down to Font, and select Show Fonts) to select the font size and style. I use a Garamond-esque font face, usually between 12 and 13 pt. size. Do this for each Level.

4. Mess with the Level formatting – Change Level display options.

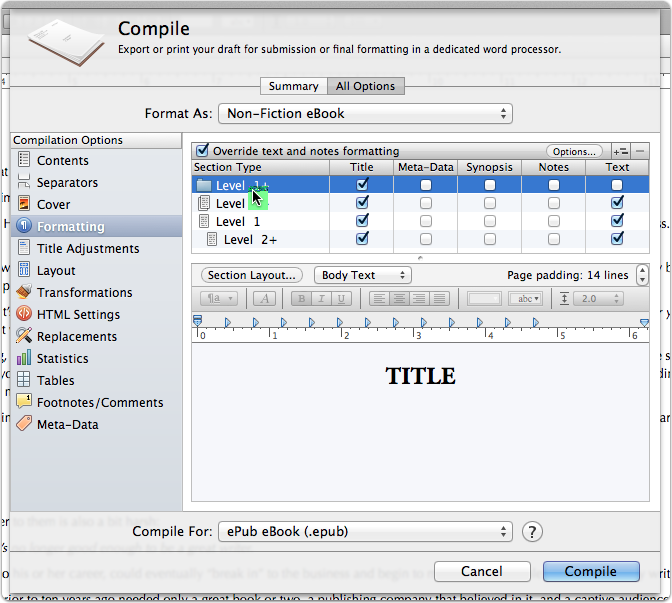
Once you’ve standardized your text throughout the document, it’s time to set up the Headings and Subheadings used in your document. See the below screenshot for an example of what I mean be “Headings.” You’ll see the word “TITLE” is all caps, bolded, and in a larger font than the rest of the text. This is under the “Level 1+ (folder icon)” section:

What we’re messing with here is the introductory text before the main content. In this case (“Level 1+” with the folder icon), I just want the title of the Part. As you’ll notice from the first screenshot above, I include the “Part #:” prefix in the title of the individual parts.

To change the content of these Headings and Subheadings, click on the “Section Layout” button. You should see something this window:

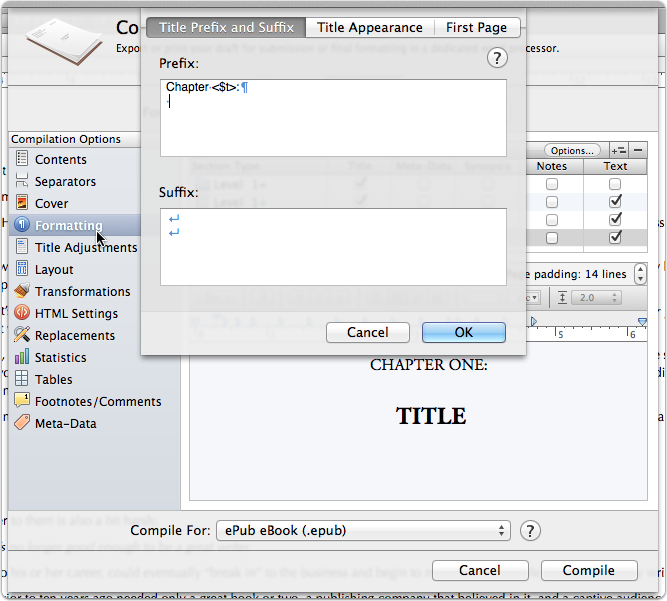
In this screenshot, you’re looking at my lowest level Heading — “Level 2+.” You can see the words “CHAPTER ONE” and “TITLE” below the dialog box, both capitalized. Inside the dialog box, you can see the way these Headings are generated.

The word “Chapter” is written, and then you’ll see “<$t>” and a colon. The “<$t>” is the shorthand Scrivener uses for the chapter number, spelled out as text (“one,” “two,” “three,” etc. as opposed to “1,” “2,” or “3.”). Then, I pressed Enter (Return) once, and did the same thing in the Suffix box. This gives me the correct Chapter introduction text and the right spacing.

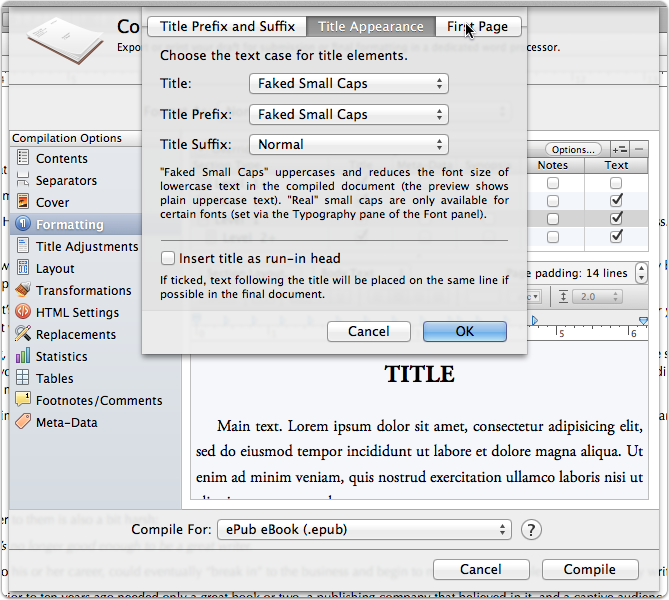
I also change the “Title Appearance” to “Faked Small Caps” for the Title and Title Prefix, to give me a bit more of a  professional appearance that translates well to e-formats:

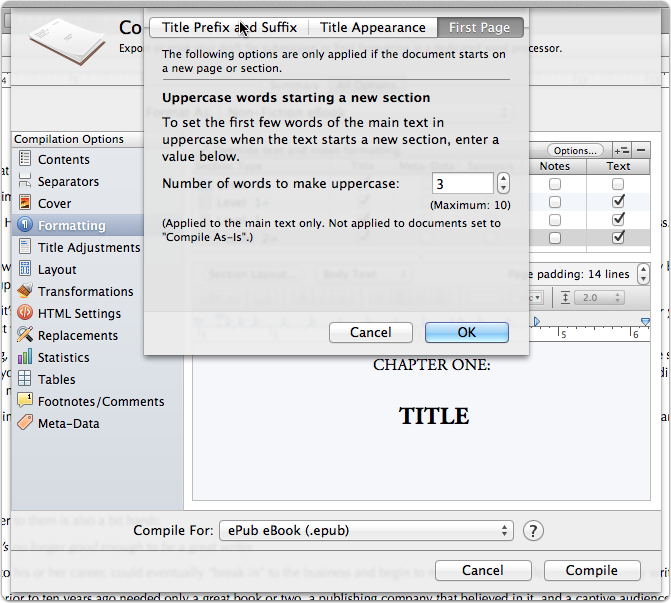
Finally, I’ll change the “First Page” tab options to dynamically capitalize a certain amount of words at the beginning of each new section (a nice little way of making the book look more professional):

5. Compile!

Honestly, that’s all I change. Make sure “Convert Scrivener links to HTML links” is checked under the HTML Settings tab, but other than that — I don’t mess with any other options. Click “Compile” and save the document somewhere.

The hard part’s over — now we just need to convert the rendered e-Pub file to Kindle-friendly format.

6. Converting to Kindle using Calibre. 

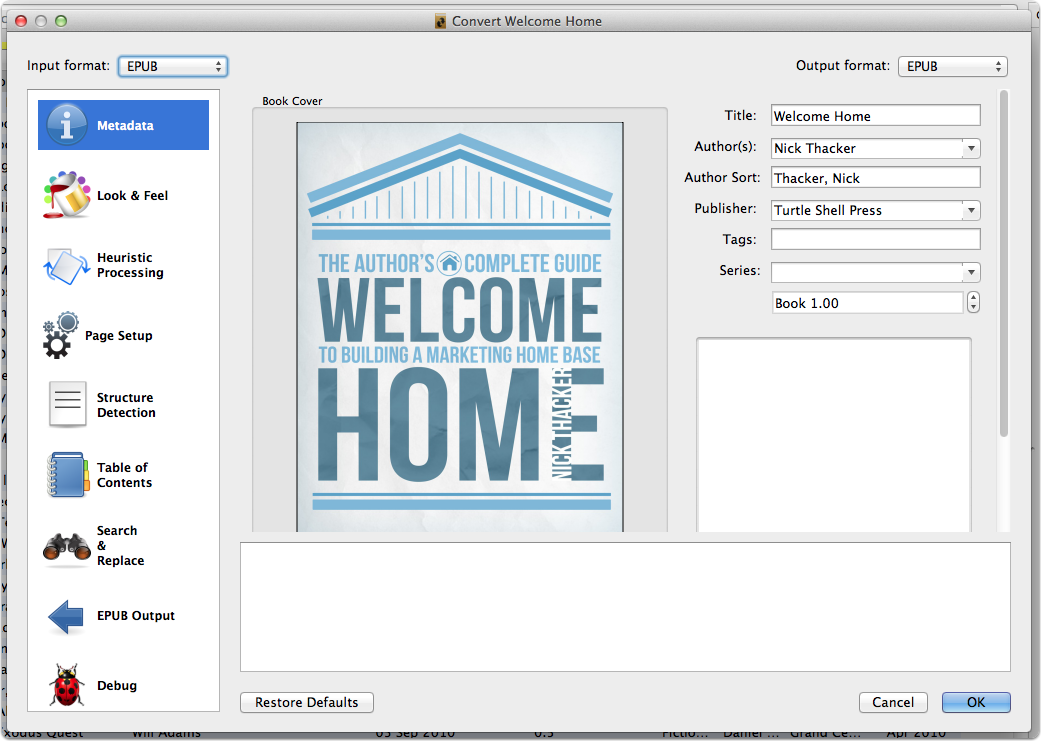
Calibre is a cinch — open the program and click the “Add Books,” then browse to the converted ePub file you compiled in Scrivener. You’ll see a panel that looks like this:

Under the “Output format” dropdown, change EPUB to MOBI, and you should be good to go!

Make sure your cover image is included, and edit the metadata with your author name, title, and publisher.

Under the “Table of Contents” tab, make sure “Force use of auto-generated Table of Contents” is unchecked, and click OK. Your book will be converted and placed into your Calibre library!

After that, your file will be available to you in ePub and .mobi format, and you can use Calibre’s exporting feature to generate any other format you’d ever need. To test the Kindle version, you can download the Kindle app for any device you own, or you can try using the KDP Select Kindle uploader, and preview directly in the browser.

I hope this tutorial helps — generating a Kindle formatted eBook from Scrivener isn’t really that difficult, as long you keep things simple!

Let me know what you think, and what questions you might have!

Nick ThackerScrivener: The Ultimate Guide to Exporting Ebooks (Kindle, ePub, etc.)
  • Scrivener sounds EPIC! I love the idea of using it for research. What a time saver! I’m not going to lie, though, it’s quite intimidating to someone like me who’s never seen screenshots or demos before this post… I’m not keen on learning a whole new program for writing, but it may be worth it if it’s as helpful as all of my writer friends tell me it is.

    • Hey Jill! 

      That’s what I love about Scrivener — you don’t need to learn much of anything to get started. You’re faced with a blank screen and a cursor — just start typing! As you write more with it, it “intuitively” starts to make sense. 

      On top of that, they have the BEST user guide I’ve ever seen — hands-down. It’s easy-to-read (and fun, believe it or not) and is VERY helpful and clear. 

      Anyway, sorry to be a “fanboy” — it really is that good!

      Take care!

      • Fanboy away, Nick! All of that is good to know. Maybe I’ll try installing it on my home computer this week (my Mac can be temperamental) and let you know how it goes!

  • What a top tutorial. I love Scriv and I’ll be shortly exporting things. I was a little worried to be honest. I didn’t know how tough it would be. This will help me A LOT 🙂

    Top show Nick, top show

    Matthew (Turndog Millionaire)

  • Bart

    Nick,
    I started using Scrivener a month ago and love it. I’m not to the point where I’m worrying about output yet but this info will sure come in handy!
    Bart

    • Hi Bart! Yup, you’ll need this when you’re done writing, so keep it close by! Scrivener’s amazing, but does have a bit of a learning curve. 

      Let me know if you need specific help!

  • Pingback: Blogs for self-publishers September 2 – 8, 2012 — The Book Designer()

  • Edwin Tipple

    This is a very good post Nick,

    There are lots of features here that make me wish I had the Mac version, but I don’t. The Windows version is pretty good but lacks some of the formatting for ePub compiles. Like the hard returns in the suffix – you show 2 – for spacing below the chapter headings are ignored, and for the moment I’m adding them to the head of each text instead. I’ve had some dialogue with Scriv about this and it may get into the next release. But if you know any other tricks to achieve this in compile, I’d love to here them.

    Eddy

    • Interesting — I’ve only used the Mac version, and it does it pretty well. I would have no idea where to begin, except maybe trying the ASCII reference for “hard return” instead…

    •  Yes, the Windows version is much less robust on options during conversion; I ended up compiling into epub format then opening in Sigil to make minor format changes. Once they update the Windows version I’m sure it will be perfect for creating epub documents but for now, it’s a real pain. 🙁

  • jswwrites

    I use Scrivener to write, but I can’t make the Compile feature work in a way that produces what I want, so I end up cutting and pasting the whole thing into Word once I’m done editing, and messing with chapters and all that in Word. I use a company to do my formatting – I figure if I can’t use the Compile feature, formatting for ebooks will be a nightmare!

    BTW, Scrivener is good for fiction but GREAT for nonfiction. My husband recently wrote a nonfiction book that was non-linear in format (meaning the chapters could be in almost any order). He originally used over 45 Word documents! Nightmare…  I moved them all into Sciv, and did all the editing there. It was so much better!

    • Hi jswwrites!

      Thanks for the comment — What issues are you having with the formatting? And if I might add, I’m launching something new pretty soon that’ll offer some great help with the compilation stuff! Stay tuned!

  • Stacey Mitchell

    I love Scrivener but have always formatted ebooks in Word. I’ve bookmarked this article ready for next time!

    • Word has it’s benefits, unless you’ve started writing in Scrivener… then you realize what you’ve been missing all these years!

      All joking aside, Word is great for creating simple, shorter, and print-ready documents, but I HATE formatting Word files for electronic publishing (and I’ve started using InDesign for longer print books anyway). It’s just too clunky, terribly at collecting “chapters” and “sections” together under one roof, and there are WAY too many “features” that I can’t ever see myself needing.

      Scrivener for me!

  • PF Duggan

    Please note the following comments relate only to Scrivener for Windows. I use Scrivener for Windows and it’s a very good product. But it can be a pain setting up a Table of Contents using the Scrivener Structure & Content table . Also most of the Scrivener tutorials and help stuff seem to aimed at the Mac version. This is a mistake and I hope the people at Scrivener sort it out as they are two different products. That said – I still love 
    Scrivener for Windows but when I change my computer during the next six months I’m going to move to Mac and get Scrivener for Mac.

    • Yes, see my comment above — setting up the TOC in Scrivener, for anything other than .PDF export, is a pain. It’s not that it’s done poorly, I think it’s that it’s too complicated. Again, I recommend going to .epub and then using Calibre (free) to convert to .mobi.

  • Pingback: Writing Blog Treasures 9~23 | Gene Lempp ~ Writer()

  • C.A.

    So what are the cons of exporting directly to mobi? I’m trying to figure out the best way to get my e-book formatted for Kindle. And I thought Indesign would be the best way, but the past few days I realized Scrivener is the least complicated approach. And my book is already in Scrivener.

    • Well, .mobi from Scrivener has been acting up for me — it’s not exporting a table of contents correctly, and sometimes the cover image is lost in translation. Also, since .mobi doesn’t do ordered and unordered lists, I’ve found it’s just far easier to use Scrivener to export .epub (a much more simplified electronic format) to take out the “crap,” then use Calibre to handle the .epub to .mobi conversion.

      It’s worked like a charm for me!

  • Pingback: The Turndog Tales: the weeks best news()

  • Pingback: Scrivener: An Introduction to Novel Writing()

  • Carol Butler

    The TOC generated within Calibre included all my front material. How to exclude that? Also, how do I get the epub to mobi conversion per your directions into my computer Kindle Previewer? Cannot seem to drag it. (have managed to see that I can click on the format Mobi and check it out within Calibre). And one other minor problem (nothing minor of course) is that I’ve got double names of my within my chapter titles.

    • Hmm, it’s in the preferences somewhere, but I’m not sure which one. I’d recommend importing into Calibre only the data that you want to be converted; i.e. just don’t compile the front matter from Scrivener (or whatever you’re using). Hope that helps!

  • Kerry Howard

    Great article. Thanks. Please can you tell me if you crested a linked index for your non fiction books using scrivener? I am a bit lost trying to convert to ebook using the software and have an index. Any advice is most appreciated.

    • I didn’t do an index, as I wouldn’t even know where to start! I think it’s something Scrivener does not do by default, and it would need to be done “manually” I believe.

  • Pingback: The Top 10 LiveHacked.com Posts of 2012 - LiveHacked()

  • Coach Foulds

    Great article mate! I’m looking to purchase an eBook writing program and i’m just about sold on Scrivener now I know it can export in all my required formats!

  • Vikram

    The table of contents appears as one long list and doesn’t get divided into chapters and sub-chapters, based on the folder structure that I have specified in the Binder. Is there any way to solve this and make the table contents appear the way it should?

    • Hmm, that’s something that I think needs to take up more than one post… Let me get back to you on that. Thanks!

  • Pingback: Blogs for self-publishers September 2 – 8, 2012 — The Book Designer()

  • TromboneAl

    Thanks for the article. You say “To change the content of these Headings and Subheadings, click on the
    “Section Layout” button.” Where is that button; I don’t seem to have it (Windows)?

    • Hmm, that’s odd — I don’t have a way of checking the Windows version, but I’d assume it has a similar feature. I do recommend the manual, as it’s one of the best-written I’ve seen, and very thorough. Good luck!

  • Oskar

    Is there a way to save a “compile template” (not sure what it’s called, english isn’t close to being my second language) so I don’t have to do this process all over again when I start a new project?

    • Sure — should be under the template drop down menu, under “Save Selected Template As…” or something like that.

  • Alex Stearn

    Hi Nick
    Great article. Thank you . I a using scrivener and I have nearly finished it but need now to format and edit for Kindle. Are each of your folders ( Part 1 , Part 2 ) Chapter headings and then the text within those folders subheadings ? Did you use a template to begin with? Can i find all the info in the manual? thanks

    • Hi Alex. Yep, that’s one of the trickier parts of Scrivener, but it’s completely doable. I can’t remember off the top of my head, but I know the manual covers it in-depth.

  • Pingback: Creating A Table Of Contents in Scrivner For Mobi Files - Imagine. Challenge. Create.()

  • John Ellsworth

    Xn you tell me how to set up scriv for a boxed set? This info isn’t available anywhere with a google search, at least that I can find!

    • Interesting question — I’m not sure I follow? Do you mean how to add multiple books into one larger “book”?

  • Pingback: Starting out as an indie author: preparing your manuscript for ebook retailers | Ruth Nestvold – Indie Adventures()

  • Ryan

    bless you and this article. I’ve been struggling with the compile function and the irregular outputs. this post set me straight!

  • Judy Sanchez

    Thanks Nick…as usual…you hit the nail on the head!! Just downloaded this to learn for the “next” one.

  • This came in just the nick of time for me. Great guide to compiling that gave me just what I needed without being overwhelming.

  • Thank you so much – screen shots saved me!

  • AndrevanHaren

    Nice article, Nick!
    Some questions: do you write the names of the folders and documents that show in the binder also in the documents themselves as titles? Maybe I only should use the body text in the documents and let the compiler add the titles?

    What about graphics? I use a lot of screenshots in a tutorial I am working on and their positions should not be moved around. Can this be done while converting as you describe?

    thanks!
    André

    • Hi Andrevan! Good questions — I do add the title to the documents in the Binder, though for fiction they’re simply “1,” “2,” etc.

      For images, I’ve found that including them center-aligned will work fine — Scrivener just shrinks them to fit perfectly on a compiled page!

      • AndrevanHaren

        Thanks, Nick. I was wondering already why the images showed up smaller in the compilation. I always center-align the images which gives the best result.

        So to understand this correctly, you are not placing any kind of title in the documents themselves and let the compilation take them from the binder names, right? Otherwise they would show up 2 times in the ebook.

        One last question, Nick. Is the The Fiction Writer’s Guide to Writing Fiction still around? I noticed that a lot of people are asking for it, but they don’t seem to be able to receive it.

        Thanks!

  • Pingback: 5 Publishing Tips I Learned From Working at Amazon | Alexis Radcliff | Lexirad.com()

  • Jon A

    Hello,

    Thank you for your contribution. I have lots of data for my subject but am having a problem with the overall outline. I have tried to determine the Chapters but am stuck. I am finding your article here to be very helpful. I am posting this OFF TOPIC reply because even though I am drafting an ebook, the outline you shared above is also very helpful. Do you have any additional notes or outlining in Scrivener ? or templates ?

    Please advise.

    Jon
    [email protected]

  • slowsmile

    I also use Scrivener(Windows verson) to create ebooks quickly and, like you, I don’t even use the compiler Formatting options — I switch it off. I just have a completely flat file structure in the Binder which exactly denotes the TOC structure of the eventual epub. It consists of Front Matter, Story and Back matter with said folders used to split my book regions up.

    The one area where I do differ from you is that I would never use Calibre to convert my epub to Kindle. I would use always Kindlegen — the proper Kindle command line tool — to convert my epub to mobi. Or you could also use Kindle Previewer which also uses kindlegen under the hood.

    • Kindlegen is clunky, hard to understand, and has an even more terrible interface than calibre. What’s the benefit?

      • You don’t have to open KindleGen, you can use it within Scrivener. Just unzip the file and tell Scrivener where it is located, and it will use it to create your .mobi. When you try to create a .mobi but haven’t set it up yet, Scrivener directs you to locate the application. You ony need to link them.

        Think of it not like you are using the command line, but rather Scrivener is using the command line. I never saw a bit of code when I did it this way.

    • @slowsmile:disqus One thing to keep in mind if you don’t use the formatting options, are your chapters being converted into clickable links? IMO that’s one of the best features of using Scrivener to create the draft, is it’s so easy to make the table of contents linkable.

      • slowsmile

        Yes, my chapters are all automatically converted into clickable TOC links on export. Whenever I export my epub, I always get an epub TOC that is automatically generated with clickable links.

        I suspect you’ve been watching too many Scrivener videos made by Scrivener users who are detail freaks. I made that same mistake as a SCrivener newbie. So here’s my philosophy with Scrivener and epubs: Unless you have a very good reason to use the precompiler Formatting options then I would avoid iusing them completely because it will just complicate things. Furthermore, I can say with hand on heart, that any formatting that you can do using the pre-compiler Formatting options — you can also do using As Is — more easily.

        I don’t use the precompiler Formatting options at all because there’s absolutely no need for me to use it. I just use a simple flat file structure in the Binder(using only sheets — not folders) for my TOC. Then I just set the pre-compiler Contents export options to include all sheets As Is with page-break-before throughout. So in effect what I am doing is writing my ebook in the Scrivener Editor exactly as I would do on a typewriter — I just format as I write. So what you see in your Scrivener Editor is exactly what you will get in the epub after export in terms of layout, formatting, styles etc when you export the scriv doc. So there’s really no need to learn the weird script for the headers or learn the weird relationships between Level 1, Level 2 and Level 3 and sub-folders in the precompiler Formatting options. Why complicate things?

        I usually always also reformat the epub TOC in Sigil after export — I add extra spacing, change font, font-size in the TOC and do several other things — such as adding the Go To guide menu items for Begin Read, Cover and TOC. I also add extra globals and presets to my epub stylesheet by hand as additional personal styling. This doesn’t take that long.

  • slowsmile

    I started out as a C programmer in the late 80s. At that time everything was green or white writing on a black screen — no Windows. There’s nothing really to understand with a command line tool like kindlegen that’s so easy to use. Just set a path to kindlegen, type it in on the command line with your epub name an its done..Another important point is that kindlegen is about as close as you’ll get to the actual Kindle conversion engine. That’s why I always use it.

    And anyway, Kindle Previewer is a window program that will convert and, at the same time, test your ebook across all emulations for Kindle devices. Kindle Previewer also uses kindlegen. Kindle has also brought out a separate Kindle Previewer 3 Beta version(no conversion) that shows just Android, iOS and KF8 Tablet emulations of your epub. It also displays Kindle’s new and improved text rendering capabilities. Both KP and KP3 are very useful for end-testing your conversions.